In this seed sowing and transplanting guide, we’re going to focus on milkweed, but all the procedures can be easily transferred to other types of plants. Growing plants from seed is very rewarding and it is as much an art as it is a science. So, experiment, have fun and don’t give up if you fail the first time.
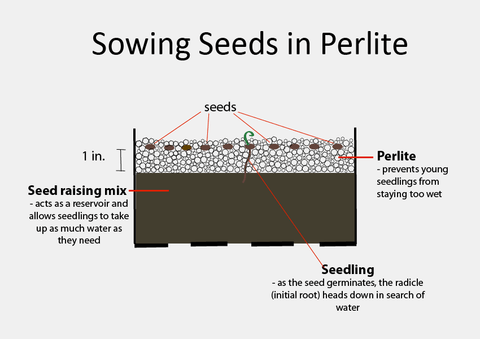
One of the greatest challenges of germinating seeds is managing moisture so they do not become too wet and succumb to damping-off diseases. The following method of using a combination of seed raising mix and perlite minimizes the threat of overwatering and makes growing plants from seed a lot easier.
What is Perlite?
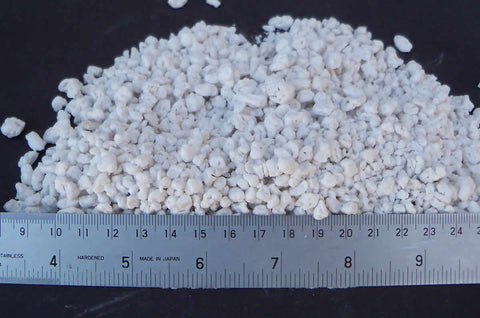
Perlite is a naturally occurring mineral with a high silica content. When exposed to very high heat it softens and expands up to 15 times its volume, in a process similar to what happens to popcorn when it’s heated. Perlite is light-weight and used in horticulture as a soil amendment and media for hydroponics.
Why use perlite for seed sowing?
- It is porous and allows air to enter freely
- Can hold water, but also provides excellent drainage
- Is sterile and contains no disease spores or weed seeds
Selecting a container for sowing seeds
When choosing a container the main requirement is that it has holes in the bottom for drainage. The size will depend on the size of the seeds and how many you are sowing. I don’t recommend using a container smaller than 4 in. as once the seedlings get larger they will dry out too quickly between waterings. I like to use short, squat containers, as tall, skinny pots dry out quickly at the surface making it difficult to maintain the correct moisture content. Also, don’t forget to make sure the container has been thoroughly cleaned (preferably with a 10% bleach solution) to prevent the spread of soil-borne diseases.
Creating a reservoir
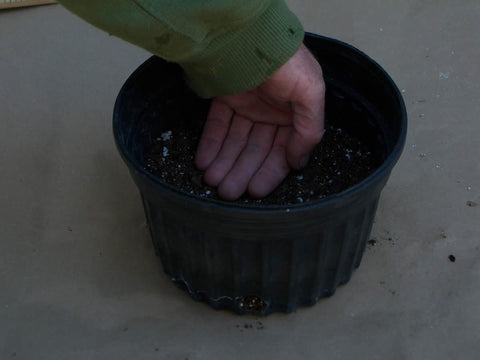
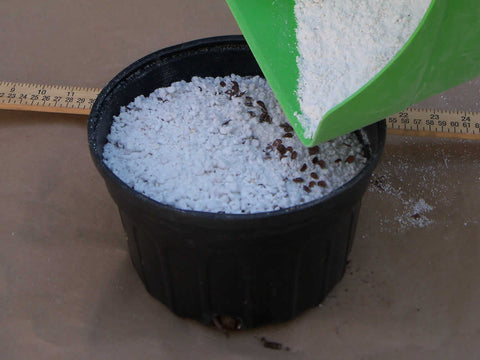
We’re now going to fill our container to within 1 to 2 in. of the top with a standard seed sowing or peat-based potting mix. Read the label to make sure it doesn’t have any fertilizer added to it - we don’t want to burn the roots of newly emerging seedlings. This base is going to act as a reservoir and hold water for the seedlings to tap into. Level out the media and lightly press it down to remove large pockets of air.
Add approximately 1 in. of perlite on top of the seed sowing mix and level it out. Perlite contains dust particles you should avoid breathing. Handling this material in a well-ventilated area and wetting it down with water helps minimize down. If you have respiratory problems, use a dust mask.
Sowing the seed
The biggest mistake I still sometimes make when sowing seeds is spreading them too thickly. If you have a lot of seeds, make a conscious effort not to sow them all, or at least spread them over two or more containers. If not, a whole host of problems will arise - from poor air circulation around seedlings to crowding out each other - making it very frustrating to transplant.
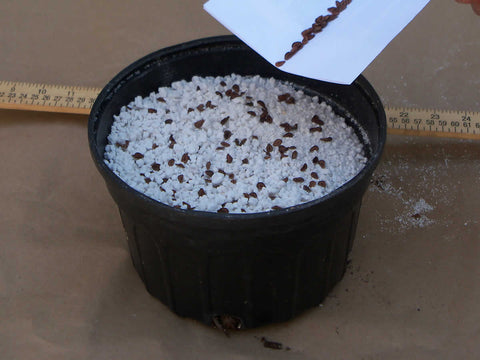
When sowing seed I like to use a folded piece of paper to slowly spread the seeds out. You’ll notice that they aren’t all evenly spaced. This is less of an issue than having too many seeds in the container.
Covering the seed
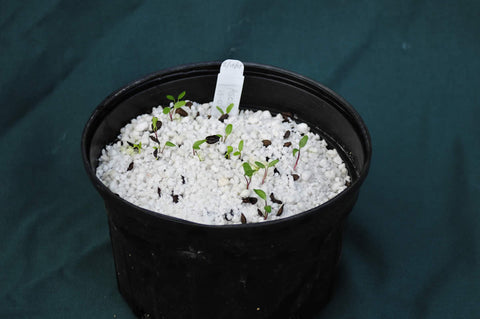
Lightly cover the seeds with perlite; this keeps them in place and prevents the light seed from blowing out. Also, label each container with the plant name, date, and other information of interest that can be easily forgotten over time.
Watering
Soak the container in a dish of water until it is thoroughly wet. I usually let it sit in water for an hour or two then test it by picking it up to make sure it is heavy and saturated with water. Let the excess water drain out, then place in a plastic bag to keep it from prematurely drying out and help prevent any animal disturbance.
Where do I put my seeds until they germinate?
Option 1 – seeds sown in spring through early summer
Placing the container in the fridge for 3 weeks. Longer won’t hurt, but check periodically (if longer than 3 weeks), as seeds can sometimes start to germinate in the fridge. Once the seeds are taken out of the fridge and the temperature is consistently above 75 °F, germination usually occurs in one to three weeks.
Option 2 – seeds sown in mid-summerDepending on what climatic zone you live in, it may be too late to place seeds in the fridge, wait for germination, and get plants established before winter. If seeds are sown, but not stratified in the fridge, most species will wait until the following spring to germination, though some southern species like Asclepias humistrata, Asclepias lanceolata, and Asclepias rubra may go ahead and germinate without having a stratification period.
Option 3 - seeds sown between late summer and late winterSeeds will germinate next spring. Keep outside away from direct sunlight and try not to let the container freeze solid for extended periods through the winter.
Germination
Like babies, young seedlings are fragile and defenseless but have an instinctive incentive to stay alive and grow. Fortunately, unlike babies, seedlings don’t need food at this early stage of growth and have just two basic requirements: light and water.
Light
After the seeds germinate, I like to move them outside to an area with filter light and keep them in the plastic bag that they germinated in. Keeping them in the plastic bag maintains a humid microclimate and prevents premature drying out animal disturbance, and damage from heavy rain or hail. Be careful not to leave the seedlings in direct sun while they are still in a sealed plastic bag, as it will act like an oven and cook them.
Over the next week, I gradually open the bag to acclimatize the seedlings and, weather permitting, they are out of the bag and placed into morning sun with some afternoon shade. The seedlings can tolerate moderate frosts (if acclimatized), though I usually protect them if the temperature is going to drop below 30°F.
Water
While the seedlings are in the plastic bag they probably don’t need watering, as they were soaked after the seeds were sown. Once out of the plastic bag, I have found that the best way to check for watering is to lift the container and check its weight. This is where the beauty of perlite as a seed germination medium comes into play. Because perlite drains so well, you can use the motto, “when in doubt, water.” The exception to this rule is milkweeds that prefer drier conditions, like Asclepias amplexicaulis and Asclepias humistrata. I try to let these milkweed seedlings dry out a little between waterings. I use a watering can with a fine rose to water, but you can also soak the container in a dish of water for 5 to 10 minutes and achieve the same result.
Fertilizer
Don’t be in too much of a rush to start fertilizing. I can’t recall killing a single plant from using too little fertilizer, but I’ve killed my fair share of plants from getting too eager and fertilizing too soon or using too much. Once their true leaves emerge (the first leaves are called cotyledons and have stored food in them), start using a liquid feed at 1/4 of the recommended mixing instructions on the label.
Let's review:
- Protect young seedlings from drying out, animals, and extreme weather
- Supply filtered light while seedlings are still in sealed plastic bag
- Gradually move seedlings out of plastic bag and into more sun
- Check regularly for watering and if in doubt, water
- Don’t over-fertilize seedlings
Transplanting
Transplanting seedlings is sometimes seen as a surgical like procedure with do-or-die consequences. While it does take some care and patience, seedlings are fortunately programmed to grow, and all we need to do is provide the conditions to make that happen.
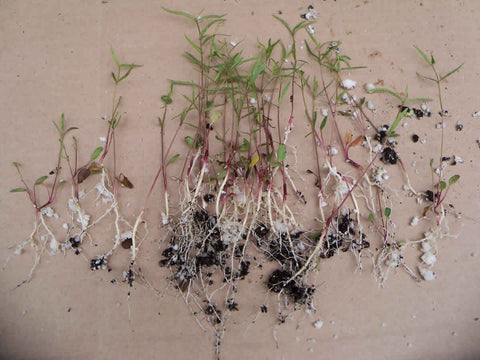
In the photo below we have a pot of Asclepias lanceolata seedlings that need to be transplanted. They could have been transplanted earlier, but it is better to transplant them a little big than too small. If we didn’t transplant them from this pot, the larger seedlings would eventually crowd out the smaller plants in nature’s survival of the fittest. Transplanting them into individual containers will level the playing field and give them all an equal chance to grow into mature plants.
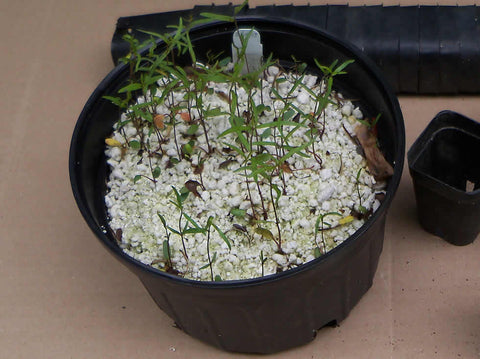
It’s very easy to get enthusiastic and transplant the seedlings before they have an established root system. Generally, you will have more success if you wait until the seedlings have at least several sets of leaves before transplanting.
Supplies and tools
- Potting mix
- Small pots (2 to 3 inches)
- Small knife (cutting the roots of larger seedlings)
When transplanting seedlings make sure it is done out of direct sunlight and sheltered from drying winds. If you are worried about the seedlings drying out while transplanting, the roots and leaves can be misted with water to help keep them hydrated.
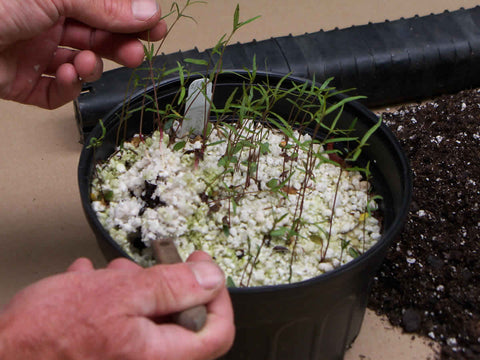
Milkweed seeds can often germinate erratically over several months. Since we want as many seedlings as possible, we are not going to dump the soil out and are instead going to cut around and remove each individual seedling that is ready for transplanting. This will keep the seeds that have not germinated near the surface and not buried too deep.
It is important when working with seedlings that you pick them up by the leaves and not the stems. Seedling stems are very fragile as they are where the water is transported up through the roots for the plant to grow.
By gently holding the leaves of the seedling with one hand we are going to use a sharp knife to cut around the seedling with our other hand. Make a cut about ½ inch out from the stem all the way around the seedling. With larger seedlings, a deeper cut may be needed to make sure you undercut the longer roots. Gently remove the seedlings by lifting them by their leaves and prying them up with the knife from underneath.
Now that we have removed the seedlings from the seed pot, it is time to put them up into individual containers. This should be done as soon as possible so that the seedlings do not dry out and die.

Potting up is fairly straightforward, though it takes a little practice. Hold the seedling by its leaves and lower it into the pot so the seedling is at the same level it was when growing in the seed pot. With your other hand gently add potting mix and lightly press it down, adding more potting mix if necessary, so that the potting mix is ½ inch below the rim of the pot.
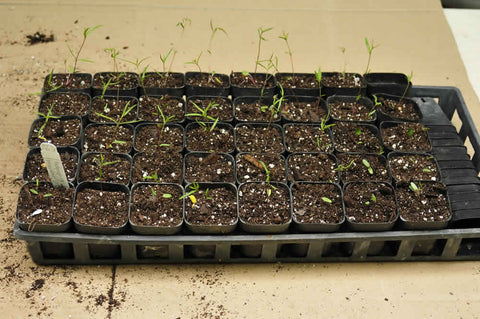
Now we have them potted up it is time to water them in thoroughly and set them in an area out of direct sun. After a couple of days they can be moved to a sunnier location.
Summary on transplanting seedlings:- Don’t transplant seedlings too soon
- Hold the seedlings by their leaves, not their stems
- After transplanting, water thoroughly and place seedlings out of direct sun for a couple of days